Adjusting your chain is a fundamental piece of maintenance, it’s right up there with checking your tire pressures but is it safe to adjust your motorcycle chain on a side stand?
Adjusting your chain on a side stand can be done safely with two people, one person holding the bike with the rear wheel off the ground while the other adjusts the chain. So to answer the question” Is it safe to adjust a motorcycle chain on the side stand? The answer is yes, but not recommended.
Click here to see out the article on How To Clean & Lubricate A Motorcycle Chain At Home
A loose chain could jump off the sprocket, bind up and throw you on the ground. A loose chain could also slap around a lot which is going to make a lot of noise, it’s also going to increase driveline lash.

On the flip side, a chain that is too tight, while less common, is also a bad thing. It’s going to put too much tension on your chain and sprockets and wear out those components, it could also inhibit your rear suspension action.
So chain slack is important but how do you know how much slack your bike chain should have? The best thing to do is to look for the specification in your motorcycles owner’s manual, or on the sticker on the swingarm.
As a general rule for street bikes, it is going to be between 30 and 40 millimeters. Your owner’s manual will give you the tolerances, It will also tell you whether to check the slack with your bike on the side stand, over the vertical or on a paddock stand.
Armed with the slack specification it’s time to take some measurements. Using a ruler or a tape measure, place on the underside of the swing arm midway between the sprockets. Pull the chain down and using a link pin as a reference point, note the measurement.
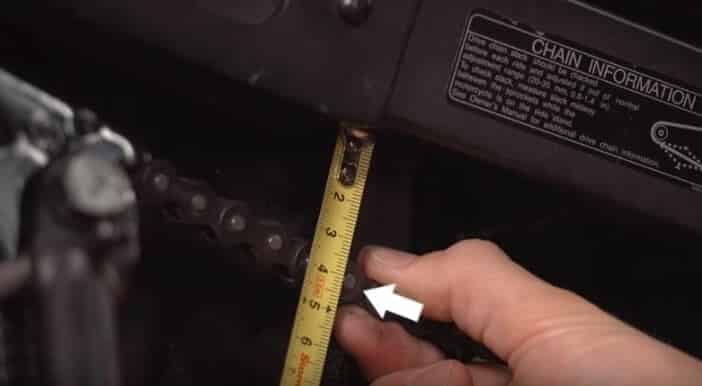
Then push the chain up and take the measurement again. Calculate the difference between these two figures and that is your total chain slack.
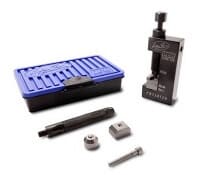
If you’re not interested in doing complex high-level mathematics, there are some pretty simple tools on the market to help you check chain slack.
I use the motion Pro available from Amazon, and it spits out a total number for your chain slack.
So I put a bunch of miles on our bike and I just measured the chain slack and it’s at 35 millimeters. The spec is 20 to 35 so it’s a bit so it’s time to tighten things up.
First, crack the axle nut loose, don’t spin it off just loosen it enough to allow the rear wheel to move in the swingarm.
There are several different styles of axle adjusters out there, and most are going to have a lock nut so you need to crack it free. Turn the adjuster a quarter turn at a time to shift the axle position and change the chain slack.
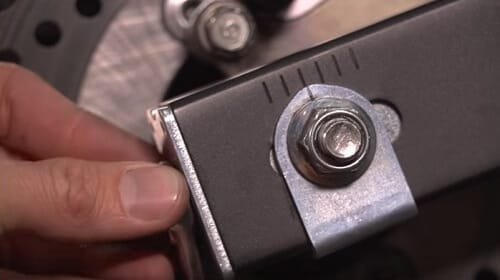
There are of course adjusters on both sides of the axle and when you’re changing your chain tension it’s very important that you make sure your wheel is straight.
To do that you should reference the little tick marks on the swingarm and on the plate on the axle and make sure they match on both sides.
These tick marks are more of a suggestion than a definitive measurement. While there are a couple of methods for verifying wheel alignment we’re going to save those for another article.
So you’ve made an adjustment, now you want to recheck the chain tension. As simple as this procedure is, you may find it takes a little trial and error so you may have to attempt it a few times to get the chain tension exactly where you want it.
Once you think you’ve got it, put a rag or a screwdriver in the sprocket and turn the wheel to pull the axle against the adjusters. Then tighten down your axle nut to the torque listed in your owner’s manual.
With that done go ahead and pull the rag or your screwdriver out and tighten down your lock nut.
Then recheck your slack one more time to make sure it’s within spec. With that done you might as well put some cleaner on a rag and wipe your chain down and then spray a shot of Lube on there.
That’s it one of the most basic maintenance procedures, there is no excuse not to do it.
When To Replace a Motorcycle Chain
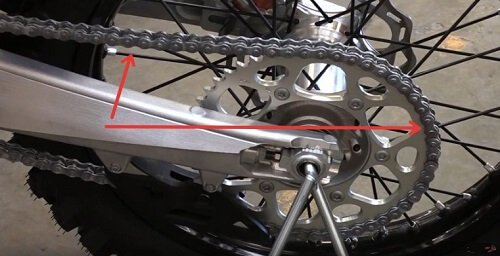
First, see if you can pull your chain off the back of the wheel sprocket and see daylight between the chain and sprocket if you can you need to change the chain.
Second, check if you notice a lot of side-to-side movement. You should never be able to twist the chain sideways, if you can it needs changing.
And finally is slack between the links themselves. If you can move links forward and back individually that is definitely a sign that you need to swap out your chain.
If you have an o-ring chain the o-rings make the chain really stiff as far as side-to-side movement goes. As the chain wears out it’s going to have a lot more movement as those o-rings disintegrate.
You should always change the chain and the sprocket out at the same time, why? If you just changed the chain and put it on a damaged sprocket that has some wear on its teeth you are going to make the new chain wear out twice as fast.
You might as well do it all at the same time and be good to go for a longer period of time.
You now have three telltale signs that your chain and sprocket are in need of replacement. Refer to your owner’s manual to take a look at the specified slack that’s needed for your chain.
How Long Does It Take To Change a Chain And Sprockets?
As a rule, you want to replace your chain and sprockets as a set. Throwing a new chain on used sprockets it’s going to wear out your new chain prematurely. It doesn’t take long to do as long as you have some basic tools, most people can do it in about thirty minutes.
The same goes for putting new sprockets on a used chain. Swapping out your chain and sprockets isn’t complicated. You will need a rear stand, tools to remove your rear wheel as well as your front, and a chain tool.
I’m using motion pros PVR tool available from Amazon. It cost about 90 bucks and you can use it to break the old chain as well as rivet the new master link.
Of course, everybody’s going to be a little bit different, but the basic order of operations is this.
Loosen the front sprocket, remove the old chain, replace the sprockets and finally install the new chain.
You’re probably wondering why I’m starting with the front sprocket. The front sprocket is torqued so it’s really tight. If you don’t have a huge impact gun you’re going to need the bike transmission and the rear brake to keep the sprocket from turning.
If you don’t have one of these now is a good time to bring your assistant in. With your biking in gear take your breaker bar with your socket on it and have your assistant stand in the rear brake.
Now lay into that nut with all of your strengths. It may be necessary to put an extension on the breaker bar, hopefully, it comes free easily.
With the front sprocket lose, put the transmission in neutral, put your bike up on the rear stand and put on some latex gloves because it’s time to remove your old chain.
Follow the instructions that came with your tool to push a link out of the chain and break it. You should work on the chain at the rear sprocket because it’s more stable, with the pin remove you can now pull the old chain off the bike.
Prop your wheel up to insure the brake disc doesn’t touch anything. Now swap your sprockets and don’t forget to tighten the nuts to the torque recommended in your owner’s manual.
With your new sprocket installed you can go ahead and reinstall the rear wheel, but leave the axle loose because you’re still going to need to set the tension on your new chain.
Putting wheels on can be a little frustrating, but just keep at it and if it doesn’t want to go in just hit it harder.
Remove the nut that we cracked free earlier and slide on your new sprocket.
You may be able to torque it by simply putting the bike in gear or you might have to wait until you’ve installed the chain.
Then call your buddy back from his beer break so he can stand on your brake while you torque the nut.
Most chains come pre-cut to the length for your bike if you ordered a long chain say 110 links when you’re biking into 108 you’re going to need to cut it down to length.
Double and then triple check the length and then break the chain just like you did with your old one. Route your new chain and then leave the ends to overlap on the rear sprocket.
Prepare yourself a clean work surface and open up the master link package. Apply the supplied grease to the pins and o-rings and assemble the parts. Pressing the side plates into place using your chain tool.
Now it’s time to rivet the master link. Without the appropriate chain tool, there is no safe way to rivet a master link. You can use a clip type master link, but they are not as safe and definitely not recommended.
To rivet the master link we’re going to evenly deform the ends of the exposed pins, tighten your tool down a little bit at a time and check frequently. Make sure you don’t tighten it so much that you crack the ends of the rivets.
With the master link properly riveted all we need to do now is set our chain tension based on the information in our manual and we’re good to go.
If you wanted how to take care of your new chain make sure to check out our chain maintenance article and check back soon for more tips from motorcycle gear 101
