Deprecated: mb_convert_encoding(): Handling HTML entities via mbstring is deprecated; use htmlspecialchars, htmlentities, or mb_encode_numericentity/mb_decode_numericentity instead in /home/u598013642/domains/motorcyclegear101.com/public_html/wp-content/themes/acabado/functions.php on line 1901
Deprecated: mb_convert_encoding(): Handling HTML entities via mbstring is deprecated; use htmlspecialchars, htmlentities, or mb_encode_numericentity/mb_decode_numericentity instead in /home/u598013642/domains/motorcyclegear101.com/public_html/wp-content/themes/acabado/functions.php on line 1901
After a hot summer and running up thousands of miles on the bike your helmet can get a little bit smelly. You know what I mean, that sweaty pungent odor that comes from miles and miles of hot summer days.
How To Remove Bad Odor From Your Helmet. Cleaning a smelly motorcycle helmet isn’t easy. Most people use household cleaners but they can damage the structure of your helmet, especially petroleum-derived products. We have put together a short tutorial to show you how to remove those bad odors with natural cleaning materials that will keep your helmet in tip-top condition.
Today you’re going to take a look at how to clean and maintain your motorcycle helmet to make sure it continues looking and smelling nice and new.
If you’re anything like me you spent the entire riding season just racking up miles on your bike, while the outside of your helmet looks like a bug graveyard the interior has been capturing all the sweat from those long rides.
A lot of manufacturers are going to have different UV coatings or Anti Fog coatings on the face shield and there’s a wide variety of different manufacturers. You want to make sure that you’re not doing anything to void your helmet warranty so always take a look at that owner’s manual.
This is something that anyone can tackle at home using simple materials found around your home but before we go any further there’s a quick note here. Make sure to consult your owner’s manual before doing any cleaning or maintenance to your helmet.
Cleaning Materials Required
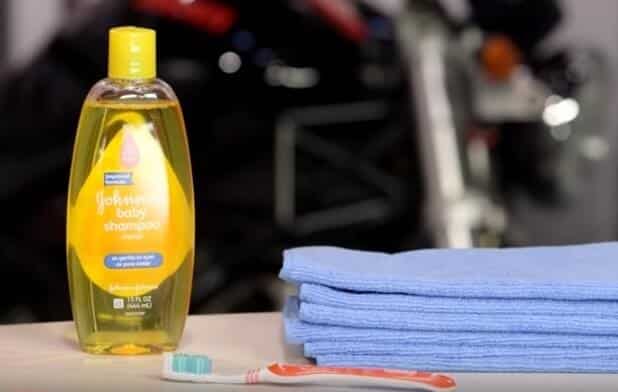
So let’s break down what you’re going to need to do this job. You will first need some microfiber rags, you will use them to clean the exterior of your helmet and the good thing about microfibre rags are they don’t scratch the helmet or the face shield.
They don’t have to be brand new but make sure they’re clean if you have some laying around the house just make sure you launder them before you start cleaning your helmet.
Next, you will need a toothbrush, it does not have to be oral-b but it does have to be something with soft bristles. You’re going to use this in hard-to-reach places the microfiber rags won’t reach.
Next, you’re going to need some Johnson’s baby shampoo, the same stuff you use to clean your hair. You’re going to use this to clean the interior of your helmet.
You should make sure you never use a petroleum base soap and this is the reason you should use Johnson & Johnson’s. It’s very gentle to the fabric and most people have it laying around the house.
Next, you will need a tub filled with warm water. You’re going to use warm water to clean the exterior of the helmet.

A Note on Cleaning Products
If I was to ask most bike riders if they would ever intentionally weaken or damage their motorcycle helmet they would, of course not, that would be just plain crazy. Unfortunately, that’s exactly what many of us are doing every time we clean our helmet.
The most important thing to remember when choosing any helmet cleaning supplies is that most of us aren’t chemists. If a cleaning product isn’t specifically designed for a helmet and you’re not completely sure how the product will react with the materials used in your helmet construction, then don’t use them.
There are lots of household cleaning products that can actually reduce a helmet’s ability to protect your head, the biggest offender is glass cleaner.
There isn’t any glass on a motorcycle helmet yet this chemical is one of the most commonly used by riders for removing bugs and fingerprints from their helmets and shields, this chemical is bad news for your helmet.
Most common household glass cleaners contain ammonia and ammonia is known to reduce the shatterproof qualities associated with polycarbonate which is what most of your sub $250 helmets are made from.
Another commonly used item for cleaning the shell is spray detailer, these products are not all bad and many of them actually do a really good job of removing bugs without scratching the helmet surface. I use Vulcanet C9 available from Amazon.
It’s very important though to be careful when choosing a spray detailer to be used as a helmet cleaner. This is why we recommend Johnson’s shampoo for the interior and hot water for the shell of the helmet.
Finally, you may need compressed air if you have vents in your helmet. You should never use canned compressed air as aerosols will eat away at your EPS liner.
You will end up damaging it to the point where it’s not going to keep you safe in the event of a crash, so always steer clear of aerosols when you’re cleaning your helmet.
Remove Helmet Peak
With all of our materials lined up let’s dive into the actual process of cleaning it. The first thing to do is remove the peak if you have one on your helmet. For any of you who has a peak or a dual-sport visor that’s the first step you just want to pull it off. If you have a full-face helmet just leave the visor on.
Remove All Electronic Equipment
If you have any electronic system installed in your helmet you need to remove it, the last thing you want to do while you’re cleaning your helmet is run the risk of damaging any kind of electronics.
Remove Interior
Next, you’re going to remove the internals from your helmet, for those of you that aren’t using an electronic system, this is where you’re going to start.
You’re should start by taking all the cheek pads out, start with the chin curtain. Pull it all out and set it aside. For those of you that have never taken the internals of your helmet out previously consult your owner’s manual.
Every manufacturer is going be a little bit different for removing the internals but in most cases, you can simply pull them out.
Pull out the liner and pull out the chin curtain, it should be a fairly straightforward process for removing all the padding. Once you pull the padding out set it aside for later.
Prepare Shell
Next is to prepare the shell of the helmet. All you need to do is wrap a warm damp micro microfiber rag around the top of the helmet.
You’re just going to let that sit for about 15 minutes or so while you start on the interior.
Take your mic fiber rag and dunk it into the warm water, make sure it’s not completely soaked but just a nice amount of water to for the cloth.
Next, wrap it around your helmet, what you’re doing here is you’re allowing the rag to dislodge any hard-pressed bugs, dirt or grime that might be stuck to the helmet.
The last thing you want to do when you start to rub your helmet down is rub it too hard. Some of those bugs might be really stuck on there and you run the risk of scratching either the shell or the face shield and nobody wants that. While the helmet shell is sitting there soaking you can take a stab at cleaning that interior.
While the helmet shell is sitting there soaking you can take a stab at cleaning that interior.
Clean Helmet Padding
Now you are going to make a start on the internals of your helmet. The inside of our helmets tend to be forgotten but they are probably the most important especially after a long hot summer.
You’re going to use a little bit of the Johnson and Johnson’s baby shampoo and a sink of warm water to clean the lining. Mix in some shampoo with the water, the reason you’re using shampoo is it removes all the oils from your helmet interior that came from your hair.
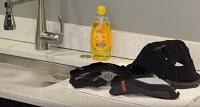
Start by submerging your helmet padding in the water, massage it back and forth like you would when you wash your hair.
Just rub them back and forth to get all the oils and the grime out of the padding, don’t be afraid to get aggressive with it.
Some of you will have removable covers for your cheek pads, I recommend just washing them with the covers on. If you’ve ever removed cheek pads you will know they’re kind of a pain in the butt to get back on and usually you can do the entire process with the liners in place.
Once you think you have removed all the oils from the padding run them under some clean water. You don’t want any soapy residue left in the cheek pad, once you feel like you’ve massaged out all the water you can give it a good squeeze and set it aside to dry.
One thing you don’t want to use is any external heat, don’t use a hairdryer and DO NOT stick them into the microwave as you can damage the plastic parts on the padding. Put them on a clean towel to let them air dry and come back the next morning.
I recommend completing this process the night before you plan on using your helmet again, that way you have a solid eight hours to let them dry before you reinstall them into your helmet.
Clean Exterior Of Shell
After cleaning the interior of the helmet it’s now time to clean the exterior of the shell. It’s been sitting for about 15-20 minutes, the warm cloth dislodging any dirt and grime.
You’re now ready to take this off and start with the cleaning process. The cloth and warm water do a nice job of dissolving some of that locked-on dust, dirt, and debris.
The first step is to remove the face shield. Every manufacturer is a little bit different so make sure to consult your owners manual if you’re not sure how to pull the face shield off.
It’s easy to snaps it off, once you have removed it wrap it in a damp cloth again and set it to the side for the time being. What you’re left with is the external shell.
Take one of your microfiber rags and soak it in warm water. Give the shell a nice liberal wipe down using a generous amount of water, you will see all that dirt coming off making sure to work in all those little nooks and crannies.
Work your way around the helmet making sure you get any of the spots that might be trapping dirt, clean and then rinse out your microfiber rag. Letting the helmet site with the warm cloth wrapped around it for that 15 or 20 minutes will do most of the work for you.
There’s really not much left to do except to wipe off any of the excess bugs or dirt you have logged in there. If you do have anything that’s stuck in the vents or maybe around the gaskets this is where that toothbrush comes into play.
Just get a little bit of warm water on the brush and work your way around the vents. For most Street riders your biggest contention is going to be bugs. For you dual-sport or dirt riders that’s where the dirt and the mud do have a tendency to get caked in.
Clean Any Helmet Vents
The other place where I notice the dirt tends to stick is in the vent systems, especially your chin vents. Some of you will have chin vents that are removable from the inside with a little screen that you can clean, this would also be a perfect time to clean those out.
There is always the possibility that you get a big fat bug stuck up underneath your vent so make sure they are not clogged up with dirt.
One of the tricks to get those vents clean is to use a little bit of compressed air and like I said, you never want to use any aerosol so make sure you’ve got an air compressor out in the garage.
You should set it on a low setting, you don’t want to blow through so hard you actually push that vent covers off. You just need to dislodge anything with a quick blast that might be lodged in there.
Once you have this shell cleaned take a dry microfiber rag and give it a good wipe down, at any point if you see any extra little pieces of dirt or debris this is the time to wipe them off.
Clean The Face Shield
Now it’s time to move on to the face shield. The face shield has already been soaking in the damp cloth and this is really the tricky process as far as you don’t want to damage your face shield as these get a little bit pricey to replace.
A lot of times your face shields will have special coatings either UV coating or an anti-fog coating so if you have any doubts about your particular face shield just make sure to refer back to that owner’s manual. Muck Off is a good anti-fog spray that is available from Amazon.
The same way you clean the exterior of the helmet is to use a little bit of warm water and a microfiber rag. Don’t use any solvents or anything that could damage any of those coatings that you might have on your face shield.
Just a little bit of elbow grease nothing too crazy, like I said most of the bugs and grime should have been loosened when you had the rag wrapped around the shield.
Once you have this cleaned you’re going to take a dry microfiber rag and wipe the face shield down, this is where you’ll see if there’s any fingerprints or anything lingering behind. Don’t be afraid to hold it up to the light
The dual-sport helmets have a tendency to get pretty muddy so if you see any scrapes or scratches it might be time to replace the face shield.
Usually, you can get a pretty decent lifespan out of a face shield by cleaning it on a regular basis. Once you have finished cleaning the face shield set it aside for the time being.
Quick note. One of the things you probably don’t want to do is disassemble your internal Sun Visor, you can pull it out if you want to but 99% of the manufacturers make this a very difficult process.
Most of you are going to be using the internal Sun Visor with that exterior face shield down. Chances are you’re not going to have to worry about doing that so just clean with it still in the helmet, nine times out of ten you are going to be doing enough to get it nice and clean.
Once you’ve got the face shield clean, the internal Sun visors clean the shell clean it is now time for reassembly. Grab the internals you’ve had sitting over at the sink, keep in mind for those of you that are utilizing a comm system now would be the time to go ahead and reinstall that.
The interior is going to go back in with your main comfort liner first and then the cheek pads. Make sure the comfort liner is nice and secure and then make sure the cheek pads fit in nice and secure. If you did remove a chin curtain you can reinstall that last.
Once you have the internals all installed you have one final piece of the puzzle to complete your helmet, it is now time to reinstall your face shield. Keep in mind this is going to be nice and clean so hold it from the edges, you don’t want to get your grubby fingerprints all over it.
You now have a nice clean helmet, it looks brand-new and it is ready for you to go out and get dirty all over again, that’s the most fun part of this process getting it clean so you can get right back to ride.
Stop Your Helmet From Smelling
The easiest way to keep your helmet from sweating is to clean it more often. Grease from your hair and moisture from your mouth both contribute to the smell you get in your helmet.
We have shown you how easy it is to clean the padding inside of your helmet so why not do it a little more often.
If you have liked our tutorial on how to clean your smelly helmet you might also want to watch our video on how to clean your leather. Click here to watch out video