The best anti fog inserts that will keep you safe in all weather conditions
If you have ever had issues with fogging on your motorcycle helmet you will know how dangerous it can be. The situation can be worse during cold and rainy days or even when it’s very humid. If you were glasses you will know what I mean, you walk into a nice warm room after being outside and your glasses steam up.
I’ve tried pretty much every solution I could find and none of them worked really well until I came across the Pinlock anti-fog insert Available from Amazon .
.
What Are Pinlock Anti Fog Inserts For Visors?
The Pinlock anti-fog inserts in just like a helmet visor that sticks to the inside of your helmet visor. On the outer edges of the Pinlock insert, there is a silicon bead, this bead creates a double glazing effect which is not dissimilar to a house double glazed window.

The pocket of air trapped between the insert and your helmet visor acts as an insulator creating the double glazing effect. The good news is a lot of motorcycle helmet visors now come with Pinlock slots already added, this makes it really easy to fix the insert to your helmet.
This video explains in detail how to fix the insert to your motorcycle visor.
Which Pinlock Anto-Fog Insert You Need
The first thing you need to do is have a Pinlock ready face shield for your helmet, most helmet manufacturers provide a compatible shield that has the pins built into the side.
There’s a little pin on each side of the shield, some helmets come equipped with the Pinlock insert ready shield to go. Sometimes they even include the insert for you but with other helmets, you’ll have to purchase a separate Pinlock shield that has the pins already installed.
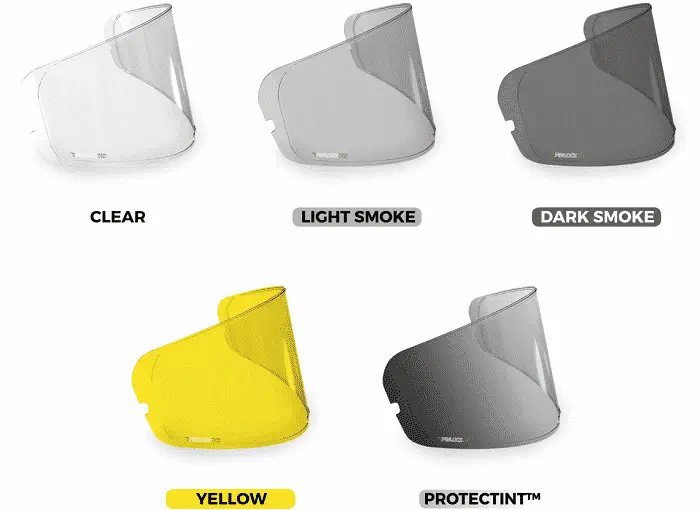
Types Of Anti-Fog Insert
The second thing you will need is the Pinlock insert. There are a few different shades and tints that you can purchase, whether you want a tinted shield or amber or yellow lens or just a clear lens.
When you open the packet it might look yellow to you, that’s because it has a protective coating on it. The thing to note here is you have a small bead of silicone that runs all the way around the edge of the Pinlock insert, it’s really thin but you must make sure the silicone side of the insert goas against your helmet visor to create that airlock we talked about.
How To Fix A Pinlock Anto Fog Insert To Your Visor
To make it easy to attach it to your face shield it is advisable to remove your visor from your helmet, different helmets have ways of removing the shield so check your helmets user manual to find the correct method.
Once you have the visor removed lay it on its face with the inside facing up. Face shields are fairly flexible so you should be able to push the two sides apart so you are able to attach the anti-fog insert in between the two attachment pins.
There Are Two Positions For The Posts
There are two positions for the posts, you’ll see there’s an A slot and a V slot and that’s just so you can adjust the positioning of the Pinlock insert up or down on the shield itself.
If you want the insert to reside a little bit higher on the face shield you’ll obviously install it on the lower pin holes on the side of the Pinlock insert, that’s usually done for more sporty applications so you can look over the top of your shield a lot
If you’re riding a sportbike that puts you down in that tough driving position and you have to look over the top of your shield you’ll need to install it in the upper position.
The only thing you’ll need to be careful of is to make sure that the Pinlock insert doesn’t hit the top of your shield gasket. The gasket that runs across the top of the face opening of your helmet and that’s what seals up against the face shield.
Make sure that the insert has enough clearance and if it does hit the seal you should switch it out and fir it lower. If you don’t it could damage your helmet gasket or scratch the inside of your visor or just mess up the Pinlock.
Attach The Anti-Fog Insert
To install the insert it’s very simple. You need to orientate it so the straight edge of the inset goes against the straight edge of your face shield and the curved edge goes against the curved part of your shield.
What I usually do is start by inserting one side of the insert onto the pin, once that’s in place carefully spread the shield flat and click the other side onto the opposite pin. As you are clipping the shield to the pins the insert is pushing the silicon to create the seal.
Once you have it in place you can remove the plastic covering from the insert leaving the insert stuck to your helmet shield. You should now have a clear face shield again depending on which color insert you chose to attach.
What the shield is now doing is creating a small bead of air in between the Pinlock lens and the outside of your face shield, that’s going to insulate the inner shield from the outer shield so that it doesn’t fog up.
What Are Pinlock Anti-Fog Inserts Made From?
It’s also made of a thicker porous plastic material which is moisture absorbing so anything that does want to condense on the inside is absorbed into the Pinlock insert.
Note – Once you have the insert attached to the face shield you need to tighten the pins to pull the insert flush against the shield if you don’t do that you will find that the silicon has not sealed correctly and you will still get fog on your face shield.
Once you have your anti-fog insert attached you need to keep it clean, there are many products available to clean your helmet, we will discuss some of them here.
Again how you remove your helmet shield is unique to your helmet so check your helmet users guide. Once you have the face shield removed you remove the insert from your face shield.
It’s a really simple thing to do, all you need to do is reverse what you did when you installed the shield. Start by having the insert facing you then spread the face shield to flatten it out.
Unhook one side of the insert from the pin on your face shield then pull the inset gently away from your face shield. Once the insert starts to lift away you can unhook it from the other pin releasing the insert.
Place the insert on a clean surface ensuring you don’t put any fingerprints on the inside of the insert that has the silicone on it.
How To Clean The Visor
When it comes to cleaning the visors you can use soapy water, one thing I would suggest you don’t use are paper towels as the paper is an abrasive material.
After washing the face shield I like to polish the inside and outside with a furniture polish that contains beeswax. I find that the beeswax allows rainwater to disperse easier and is a lot cheaper than cleaners that are specifically designed for motorcycle helmets.
Using furniture polish is OK when you are at home but if you are going on vacation purchasing a small bottle on none pressurized cleaner it good to have. You can clean your helmet at the side of the road if you need to and having a small bottle of cleaner is handy to have.
Once you have finished cleaning your visor just fix the anti-fog insert back onto your face shield ensuring you tighten the two Pinlock pins to ensure you get that seal to prevent your face shield from fogging up again.
